Sunday, October 31, 2010

Halloween 2010

Built a lot of props for Halloween this year, including a Road Warrior costume.


I used a set of football pads off of Ebay, added some spikes from some Goth Halloween store accessories.  The crossbow is a cheap pistol version that I sawed off and mounted to a shin guard.  I also got a set of catcher shin guards, modified them, added mounts for crossbow bolts.  I made arm and elbow guards from shin guards.  I used a handful of leather belts got cheap from a second hand store for straps.  The torso armor is a rubber walkway carpet protector from Home Depot.  The rabbit skins came from the Internet.  I added some fake bones and teeth, painted to weather them, from the Halloween store.  Then there's the mohawk with some temporary red dye.  A black feather boa worked for the trim around the neck of the football pads. I painted everything flat black and weathered it with brown and grey acrylic paints, watered down heavily.   The boots are some SWAT boots I already had.  And I got a military issue gasmask at a Halloween store, painted the filter bright red.  I also modified some old filters on my paint and fume mask and wore that.  And I had a pair of industrial looking goggles that went over my glasses.  

I put together several other things for the Harrison's Halloween party and for our house.  Today I had a bit of time and I threw together a rough Gonk Droid from stuff I had in the garage.  Another day of work on it and some paint and I think it will look pretty good:
 There are two 18 gallon tubs, a 9" baking pan, several scrounged parts screwed into the pan, and some simple 2x4 legs and feet with dryer vent hose over the posts.  This needs a lot more work but it was a good quick start on the project.  

I should also mention that I recently did a little event at a local Gamestop when The Force Unleashed II came out.  


Tuesday, October 5, 2010

Update on Hammer and Obelisk

I managed to get these both painted and weathered.  Both are coming along nicely and will be ready for the Halloween party.  I'm pretty sure that I'll need to whomp some kids with the hammer before that.

I've put a piece of real oak laminate that I had in the shop around a piece of 2.5" pvc pipe. I tried a smaller pipe that gripped better but it was too out of scale with the hammer head.  I'll be putting some faux metal straps around the body of the head, and some metal caps and bands on teh handle.

I bought some leather straps and I was going to wrap the handle, but this wood grain looks so good on its own I might leave it.  Notice the little spikes on the top.  Maybe they need to be bigger, and I probably need a pair on the bottom too.
I got this all screwed together and I got the wonky top adjusted and attached.  Then I hit the whole thing briefly with the orbital sander to clean up the seams.  I put some filler into the screw holes and dings.  Then I primed it with some latex primer I had laying around.  Then a coat of gray, and two coats of weathering--watered down black acrylic and watered down burnt umber.  But I don't love the finished look.  It may need to be a different base color like a sandy desert tan, and then weathering over that.

I have been toying with the idea of etching some heiroglyphics on two sides in a column and then cutting them out.  Then I could put a light inside to illuminate them from inside out.  That would look cool, but I don't know if I"ll have time to do it.  Otherwise, I think Alex and Candace may just paint some glyphs onto it.

Sunday, October 3, 2010

Sac Sci Fi Con 2010

Took R2D2 to the Sacramento Sci Fi/Horror Convention a couple of weekends ago.  Website here.  Made the rounds, saw a lot of 501st members, some Mandalorians, and others. Ed Wamser was there with his R2D2 too.


Sam's getting over his trepidations about The Empire.  Thanks to Myke Soler for being so friendly.

Saturday, September 25, 2010

Egyptian Obelisk and Thor's Hammer

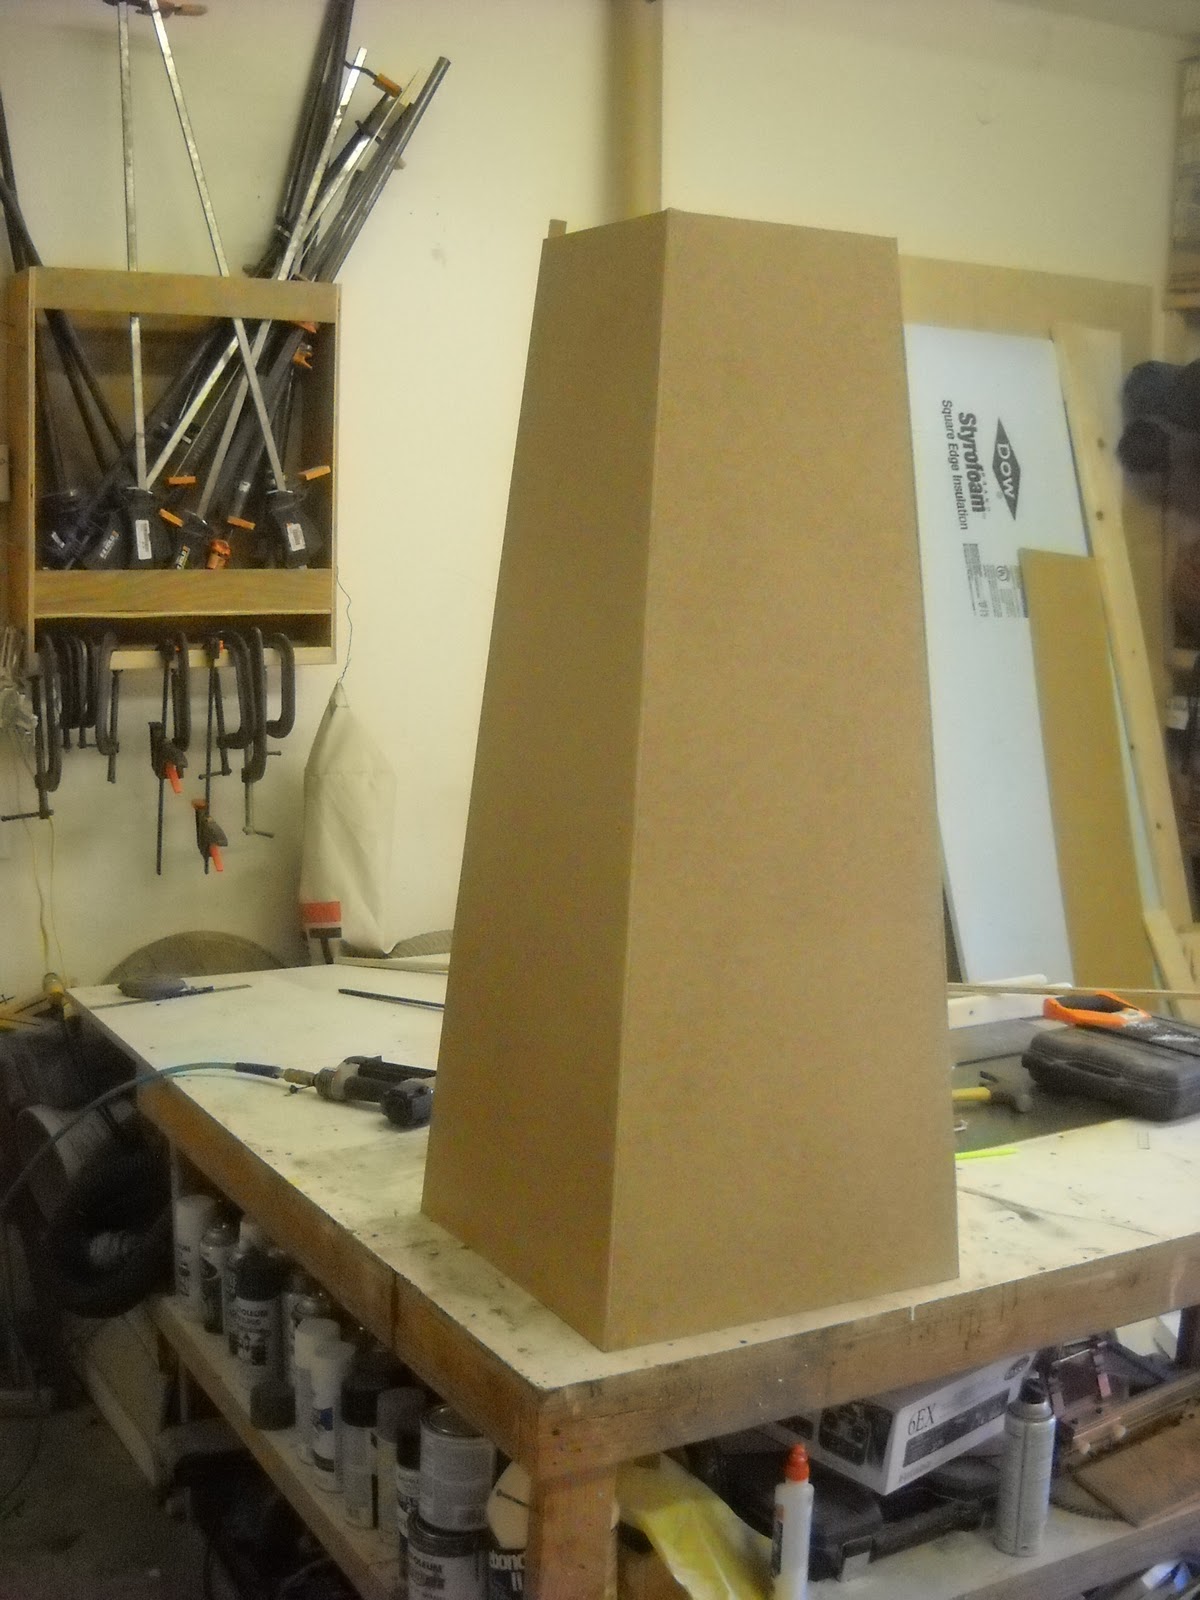
Some friends are having a big mythology themed Halloween party this year.  I signed up to help with some props.  Today I got started on the Thor's Hammer and the Egyptian Obelisk.

I cut four of these trapezoids and then nailed strips onto the inside edges of two of them.  The brad nailer made fast work on that part.  Then I nailed the remaining two sides and put them all together.

Next I put some triangles together to make the top.  Same technique, but I had to bevel the inside nailing strips.

I put that all together just loosely.  The top cap doesn't fit well, so I'll probably have to work on that some more.  I also cut out and assembled a quick square box for a base for the whole thing.
Pretty cool for a couple of hours work.  I'll get these all attached and get the edges cleaned up.  I think I'll make a mount on the base so that the obelisk slides down onto a dowel or something so I can take it apart easily.  Then I'll prime it all, paint it, weather it, and put some Egyptian heiroglyphics on it.

Next up I glued several 16" by 30" pieces of 2" foam together for the giant hammer head of Thor's Hammer.  Once the glue has set on these, I'll sculpt out the hammer heads, put a 2" pvc pipe handle on it, and paint it.  Should be very effective for smashing Halloweenies when they come to the door.  I'm going for a GWAR look.

Friday, September 24, 2010

Death Star Platform is finished.

I haven't posted in a while, but I have been working on a few things.  The platform is finished now:

You can see that I trimmed down the overall size from before, and I painted it and got the light panels done.  It's 36" wide, and 40" from the front of the curve to the back edge.  The curve is just an 18" radius circle.  And it is 5" tall.  I tried several other sizes and played around with the proportions, but this definitely looked the best given R2's size and foot print.

I primed it with the latex house primer I had around and then I put 2-3 coats of a Gloss Smoke Gray enamel on it with light sandings to 220grit in between.  That gave it a very glossy smooth finish.  I also filled and sanded all the counter sunk screw holes and everything else to make it seamless all over.  It's very cool looking in person.  I think I might put a timer on the cord to have the lights come on for an hour or two each night.

The top deck is 1/2" MDF.  I drew the curve and then cut it with a small straight bore bit on my router and a circle guide/jig on the router.  You could do it on a bandsaw with a circle jig, or even with a jig saw and then some careful sanding to even it out.  Email me for more details about circle jigs on the router if you want.  After I cut the basic shape, I flipped the deck over and using a bearing guide on my bit, I routed a 1/8" deep by 1/4" rabbet or channel around the edge.  I cut a long piece of 1/8" fiberboard for the front and side faces.  This wrapped around the base and fit into the rabbet.  When I glued it on, the channel made a good strong bonding surface with hardly any seam where the edge piece meets the top deck.  Sorry no pictures to make that clearer.

I drew 10" x 2 1/8" oblong cutouts on the edge piece, with the occasional full circle thrown in.  I used a hole cutting bit for putting new door handles because it was handy and the proportions are right.  That's the 2 1/8" circle, and you've probably got one of those bits around.  Make sure the bit is sharp and cut straight down and cleanly into the fiberboard to minimize clean up.  Once that edge piece was all cut out and glued onto the main deck.  I flipped it over and glued the light diffuser plastic panels on the inside.  This was a piece of plastic from the lighting section of the hardware store. I cut 4.5" strips of it and then glued them into the inside with some epoxy:


There's no need to be tidy or too careful here.  I just made sure that the plastic panel laid down flush to the inside of the fiberboard so that no gap shows from the outside.  I clamped these in while the glue set up.

The general look I was going for was this kind of Death Star corridor.

My recollection was that there were full circles interspersed in with the oblong cutouts in these light panels.  But looking at this shot, I may be wrong.  There's an oblong and shorter cutout at the bottom.  But nothing like the full circle I put into my pattern.  I thought I had seen that on some Star Wars set.

The lights were a bit tricky.  You don't want any regular incandescents in there because they'll be too hot.  LEDs aren't bright enough.  I settled on some relatively cheap flourescent fixtures from Home Deport.  It's hard to find anything shorter than 18" that's cheap.  I wanted them simple, with one bulb, no extra covers, and not very bulky.

 The lights were about $17 a piece

Originally I thought I might need four short ones, with one for each chamber between the cross members.  But I couldn't find them short, cheap and powerful enough.  Here I just cut some cutouts into the cross members (1/2" plywood) so the lights can go right through them.  I tried two light, but it was too dim and there were dark spots.  This configuration works pretty well.
And a closer shot here.  To attach these, I just put a screw right through the fixture body and into the bottom of the deck, without going through to the top of the deck:

I'm happy with the results:




Sunday, August 29, 2010

Ewoks Sighted in Northern California

I almost forgot to mention that while we were having our build day at Chris James' house it appears that there were some Ewoks lurking around the house.  But who knew they were so tall?  That makes them kinda scary if you ask me.

R2 Platform

Finally found the camera.  Ok, so some builders had some very cool platforms for displaying their droids at CV and that got some of us talking at Chris James' house a couple of weeks ago.  I have been brainstorming about ideas and mocking up plans to try to get the proportions right.  Here's where I am now.  I have two different plans in mind.  One is inspired, at least in my head, by some of the round Death Star platforms you see especially in Return of the Jedi.  The Freezing Chamber from Empire has some cool lighted steps that have been in my mind.

The top is 1/2" MDF.  I cut the curve with the circle jig on my router, and then I routed out a channel (rabbet) to accept the strip of 1/8" fiberboard that makes the edge piece.  There are some pieces of 3/4" plywood in a cross pattern underneath that hold it up.

This was the result after I made a template from a cardboard box and I thought it was too small.  But now I think it's actually a bit too big.  I think I'll try taking 1" off the outside the trim it down.  And if necessary, I'll lower the whole thing a bit too.  There aren't many pieces and they come apart easily with screws.

My plan is to cut out oblong rounded slots and circles in the side piece, and then put a strip of light diffuser plastic behind the slot (probably from TAP plastics), then I can mount some cheap lights inside and have it illuminated.
I figure it should be painted in a fairly dark battleship grey too.  Black would be too much.  And other colors would be distracting.

 Here's the slots I have in mind:


Next I played around with the dimensions on a wedge shaped platform.  I am picturing something like a section out of a curving platform with a curved front and back and sides that angle in.  This size and shape is pretty good although it needs some tuning up.  The foreshortening in the picture angle seems to rob it of any bevel or trapezoid shape, but the side actually do angle in some:


Here the cutout pattern is on top.  I was thinking that these panels could be cut out and then light diffuser plastic put underneath, maybe red or orange, and then have R2 lit from the bottom.

But this MDF is 1/2" thick, so the vents would be deep.  I haven't thought of a good, economical, and easy way to make the top surface flat for R2's wheels.  And I think this may be too busy to have under him.


I like some of the narrow vent patterns like you see in Deathstar decking seens (think the prison cells where they kept Princess Leia.  Jonathan Burton and Chris James both sent me some cool pictures.  But cutting that many slots in this would create tons of carcinogenic MDF dust in my garage so I'm not into it.  I suspect that using an industrial CNC machine on acrylic or aluminum is the best way to do that, and that boosts the cost of this little project way up.   Maybe I'll mock this deck shape up in the MDF and try putting light vents on the sides like the other plan.  I'll wait to get some feedback from some other builders.

So my idea was that I'd get a few workable plans on this with some different options, and then if the local builders are interested in having a build day, we can get together here sometime soon and bang out some more of these.  Let me know guys.