Saturday, March 28, 2009

Large Data Port


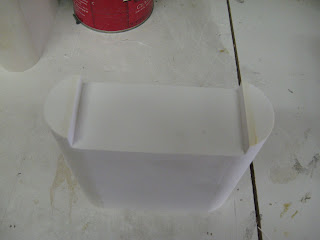
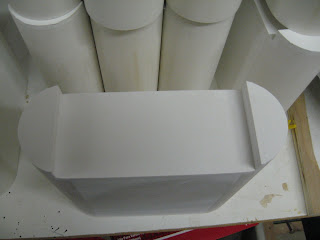
There are good, inexpensive resin data ports for R2 available from resinparts.com, but I figured I would take a crack at making my own. I'm pretty happy with the results although the angles and dimensions aren't quite in the tight range that I want. I reserve the right to change these out later with better ones.

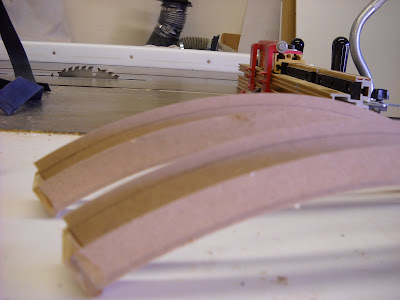
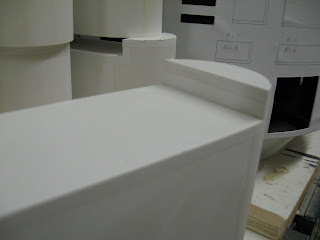
I used MDF. I think a 1/8" piece and a 1/4" piece. First I cut the circles to the right diameter with the circle jig on my bandsaw--same method I used to cut the rings for the frame way back at the beginning. I had to do some calculating and wrangling, but I figured out the angles of the bevels on the rings and adjusted some dimensions to make it fit well in my frame. Then I cut the bevels with the circle jig on my bandsaw and using the tilting table. That gave me clean cuts and even bevels. Some minor sanding smoothed out the edges. The little end pieces were easy to cut and glue. A coat of primer, some sanding, and then finish coats should make these look just fine.

I've gotten in the habit now of making an extra of everything as long as I'm all tooled up to cut the pieces. That gives me some slack and some room to screw up.


Tuesday, January 27, 2009

Rough Attachments for Some Leg Details


At this point, I have gathered—either scratch built, or bought—almost all of the detail parts for the legs. My plan is to get the legs fully rough assembled before starting to do finish sanding, filling, priming, and painting. I’m going to attach the shoulder horseshoes by epoxy-ing some short dowels into the mounting holes left from when I cut them. Here I’ve drilled matching holes into the legs and you can see the horseshoes placed temporarily on the legs. It’s cool to see these parts come together. And it surprising how instantly recognizable it all is, even at this very rough stage. But then again, for those of us who’ve spent too much time analyzing every frame of the movies are going to have some strange sensitivities. I have also located the shoulder hydraulic units inside their pockets on the shoulders. I drilled pilot holes (carefully) into the back of the hydraulic units and matching pilot holes with counter sinks on the back side into the backs of the shoulder. Then I put some tiny screws through to hold the hydraulics in place. When it comes time to attach these permanently, I’ll probably epoxy and screw them on. I suspect that heating and cooling and getting banged around could make a lot of these little parts work their way loose if they aren’t substantially attached.


I’ve also drilled out some dowel holes in the backs of the booster covers and matching holes in the body of the legs. So the booster covers will be pegged down to the legs after painting with glue too. It took some measuring and some filing to get all the holes lined up and they are still a bit too tight, but it’s getting there. The booster covers are still a bit rough and need some filling and sanding.

The boosters that I got in resin don’t fit well inside the little angled dog house. I put the calipers on them and it looks like they are out about .05. But that’s enough to make trouble. I will probably trim the insides of the covers and sand the boosters a bit too for a good fit.

And I have attached one of the battery boxes here (the one that can't be seen in these pictures). I made key hole slots in the insides of the boxes and mount small screws in the foot shells to hold them on. That won’t be a long term solution, but it’ll hold them on there for the moment. I suspect that when I get done cutting and fitting with the motors for the feet, the attachment for the battery boxes will have to be moved and changed to something bounce proof.

Sunday, January 4, 2009

Attached the Legs


Figured out a new, easier way to attach the legs to the body hubs. I'm just going to put some carriage bolts through from the legs into the inside. The heads of the bolts will be recessed a bit and then covered by the shoulders:


So now with the legs all attached it's starting to look like R2D2. How cool is that?


Sunday, October 26, 2008

Battery Boxes for Sale


On the last small run of Battery Boxes I did, there was a huge amount of interest. I sold 5 pairs in less than an hour. So I have done another, bigger run. I’ve got 12 pairs to sell.

Construction: The side walls, top and bottom are made of expanded cell PVC sheet (1/4”). The end pieces are made of PVC pipe, sliced in half. All joints are glued heavily with PVC cement. They are sturdy enough to stand on.

I have not put any holes in the front for the cables or the sides for mounting to the feet. If you are putting motors inside of them, cutting a hole in them and mounting them shouldn’t be a problem. But I don't know if different motors will be compatible with the 1/4" sidewalls and the reduced width of 2.9". These have not been tested for NPC motors.

Specs: These boxes are to club specifications with one exception. The width of the boxes is about .1" shy of the 3.00" blueprints. PVC pipe with an exact 3" outside diameter is difficult, if not impossible to find.

The inside dimensions are 1/2" smaller than the outside.

Finishing: The boxes have been finish sanded down to 320 grit. All the joints are smooth and clean. They are almost ready for primer. They may need a bit of touch up sanding here or there.

Price: $85 a pair plus shipping. Email me at mccormick@csus.edu for exact shipping costs, and paypal that email address to place your order. I should be able to get them shipped out with a day or two of getting the order.


Monday, October 13, 2008

Ankle Tubes and Shoulder Update


Here are the little tube things that go on each side of the center ankle and on the outer ankles. It took a couple of tries to get them just right, and I am still not perfectly happy with them. But I think once they are painted they'll be fine. I cut 1 inch (inside diameter) pvc pipe to length. Then I cut little squares of 1/8" pvc sheet to glue to the ends. I glued those and let them sit for a few days. PVC cement gets a lot harder if you let it cure for a while. If you sand it too soon, it'll be more flexible and soft than the surrounding material and you'll sand it out of the joint and make a groove.

Once those were cured. I used the sander to round the square pieces down to match the round edge of the pipe. This wasn't a very reliable method for getting them to perfect circles. But I couldn't think of another method that would leave me with no seams.

The little channels that are cut into the circumference of these pipes are supposed to be .03 " wide or so. My table saw blade is .1 so that was too much. My bandsaw blade was just right. I figured out the depth of the channels and put a stop on the crosscutting slider on the bandsaw so that it would stop the piece just after the blade began to cut the pipe. Then I would carefully roll the pipe into the saw blade, keeping the slider still. So it cut a groove all the way around the pipe. This was a reliable and good method with good results. It just took 15 minutes to cut all four pieces and a spare. Then I cut the little hexagonal end caps for the tubes and glued them on. A little more sanding and these will be ready to go.


Here are a couple of pictures of the finished shoulders. I'm pretty happy with these. In an earlier post I detailed how I built up the plywood pattern for these that would guide the router roller bearing as I cut them. I cut all 16 or so pieces, and glued them all together in stacks to make these ribbed assemblies. Then I sanded the outside edges down to clean them up. I spend some time putting putty on the insides of the interior pockets, as you can see, and then routing those on the forms again to clean them up. This wasn't the perfect method. If i was doing these again, I wouldn't cut the interior pockets out at all when I was cutting the individual layers. I would wait until the whole assemblies were glued up and then I would drill a hole in the middle of the pockets, and then rout that out once and all at once. Make sense? That is, instead of routing these pockets out 16 times on each individual layer piece, I would glue them all together and rout them once. Then I'd get really clean aligned inside edges. And there wouldn't be the need for putty. But I think these will clean up for paint just fine. The three dowel holes will get filled later. And I think I'll put some dowels sticking down into the legs for attachments.

Saturday, October 11, 2008

Battery Boxes for Sale


I've got R2D2 Battery Boxes for sale. I have 4 extra pairs. They are constructed from PVC. They are rough sanded and just about ready for primer. They may need a small bit of filler, and some spot sanding. They are to club specs with one minor exception:

Full Disclosure: The boxes are 2.87 inches wide instead of the called for 3.00 inches. PVC pipe with an outside diameter of 3 inches is very difficult to get in the US. But the difference would only by noticeable to someone with calipers and a copy of the blueprints.

They are $75 a pair, plus shipping. I can have the boxed and shipped very quickly. Paypal my email: mccormick@csus.edu. Send me an email with any questions.

Here's a couple more pictures:


Saturday, October 4, 2008

Vacuum Table


I can't see that I'll need a vacuum table, but I might for this project. But my brother is building Snow Trooper armor. So I put this vacuum forming table together for him today. We'll test it out soon.