
That's two pieces of the 7/16" on each side, and a piece of 11/16" in the middle. This configuration comes the closest using standard dimensional lumber to getting all of the thicknesses and measurements exactly like on the club plans. I think there are a couple of spots where this arrangement comes out to be .1" thicker or thinner than club specs. That's a minor variation I can live with, and when these are done no one would ever be able to find it unless they got calipers out and check the plans on every dimension. In my experience, many of the aluminum parts--the gold standard, as it were--for the club are actually out at least this much or more from the plans. One way to address that, if you were so inclined, would be to either run a couple of these pieces through a thickness planer and shave off a bit, or do it manually with a belt sander.
When they are all stacked, the configuration will look like this:

I'll make a suggestion here on the method that a lot of builders are using. It's tempting to cut each one of these plies out exactly to fit its pattern on the plans and then try to line them up and glue them together. Almost inevitably, that produces some misalignments. Once you get a layer of glue in there, its usually not perfectly evenly distributed. Then it's very hard to get the clamps distributed evenly and get the clamping pressure exactly even. So pieces will shift laterally a bit as the glue sets and glue will accumulate more in some spots and less in others. Then the resulting misalignments on the sides produce a whole bunch of clean up work. It'll take sanding, filing, lots of Bondo, and some tendonitis to get the sides all clean and even again.
The answer is to glue the blanks together first, and then make the cuts through the whole stack of pieces second wherever possible. That way the glue is set and the cut will make a nice clean side that will require minimal Bondo and sanding work.
That's going to be hard in any situation where there's an inside corner edge, of course. I'll document how I'm going to deal with that in coming posts.
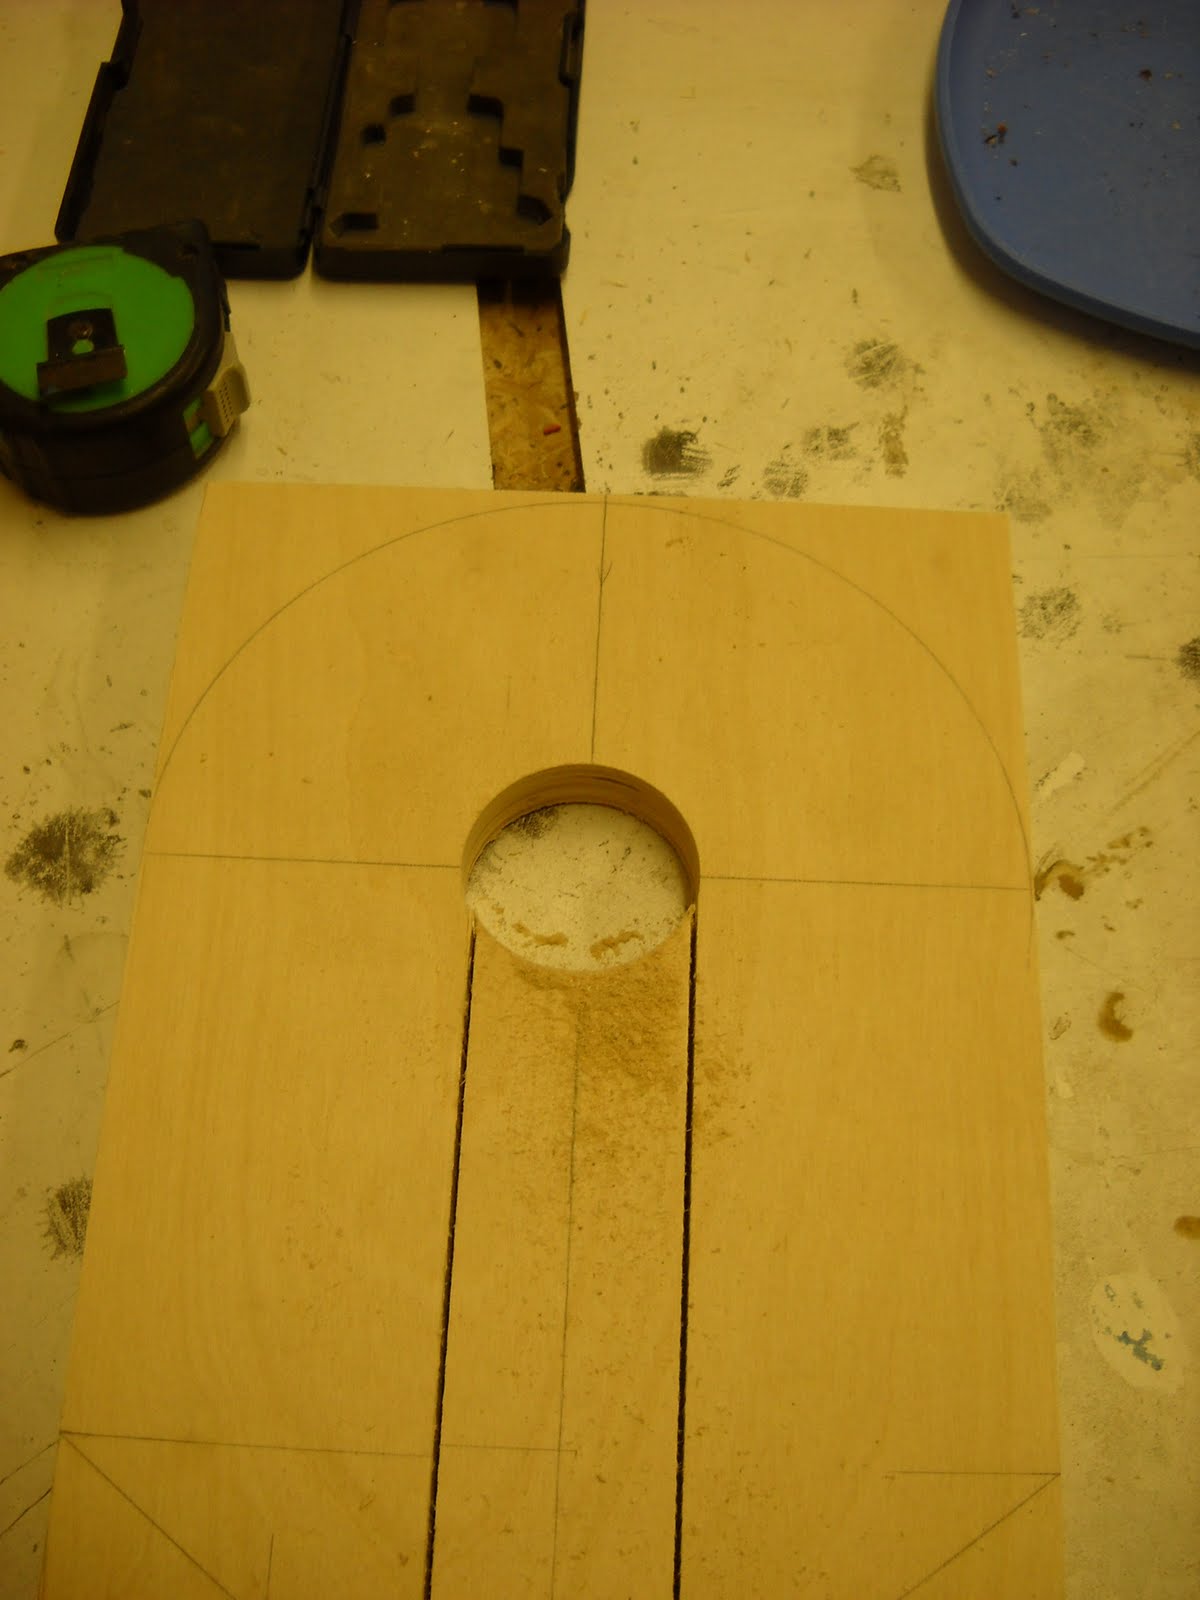
Meanwhile, the center ply, the piece of 11/16", needs to have a channel down the middle of it for wiring to go to the feet. I've set up on the band saw for this with a stop block at the end of the cut. Whenever you are cutting a lot of parts--I'm making two sets of legs here--set up a stop block on the saw fence so that you can run all the pieces through to it. That insures uniform cuts on all pieces, and it's faster than measuring and marking every piece.


Then I used a 2 1/8" hole saw to take the middle piece out. This circle is centered on the same radius that the outside of the shoulders will be. I'll put another circle through the next inboard ply to open the channel.
Next up, I laid out four holes to accept T-nuts that will be embedded in this piece. These will provide the mounting for the legs through the shoulder hubs and into the body. The configuration of these bolts will be different for you depending on which frame design you settle on.

Notice also that I have made a counter sink for the T nuts with a 1" paddle bit first, then I drilled the 1/2" hole for the body of the T nut. This is important because you want the T nut to sit down flush or lower than the surrounding plywood. Otherwise, when you go to glue another piece on top, the T nut will prevent the next piece from laying down flush and tight.
This method of attaching the legs introduces some tight tolerances on the bolts. The bolts will be coming out from the inside of the frame and into this T nut. If the bolts then go through and past the T nut too far, they will push the outer ply of the glued up legs out and possibly crack and separate the laminates of the legs. I have put a shallow dimple in the next piece that goes on top of these to make for a bit more room, but these are only 1/4" or so:

But the depth problem with the bolts shouldn't be too hard to deal with. Once the legs are all assembled, I can put a small rod down in these holes and see how much depth there is. Then you can measure the distance from the inside wall of the mounting plates in the frame out to the outside edge of the shoulder hubs. Add those two numbers, and subtract 1/4" or so for some leeway, and you'll have the length of the bolts you need measuring them without the bolt heads. Also take into account space for a big fender washer on the inside. If this length doesn't match a manufactured length, get the next size up and cut them off or add washers, etc.
Next up, I'll be gluing up the layers. An important trick for getting them aligned and clamped. Don't just glue and clamp. Line the pieces up dry first, clamp them, and then put some screws through them (but not all the way through to the front face:

These screws will act to align the pieces and prevent the drift during gluing that I discussed earlier. They they will help give some even clamping pressure. And they will significantly increase the strength of the glued joint. In fact, when joints are done like this, the resulting bond turns out to be far stronger than the surrounding wood. The wood will fail before the glue does.


No comments:
Post a Comment